A Practical On-chip Clock Controller Circuit Design 4b1in
This document was ed by and they confirmed that they have the permission to share it. If you are author or own the copyright of this book, please report to us by using this report form. Report r6l17
Overview 4q3b3c
& View A Practical On-chip Clock Controller Circuit Design as PDF for free.
More details 26j3b
- Words: 5,954
- Pages: 22
AppNote MG580225
A Practical On-Chip Clock Controller Circuit Design & Example Tessent® ATPG Test Case
January 2014
©Copyright Mentor Graphics Corporation 1995-2014. All rights reserved. This document contains information that is proprietary to Mentor Graphics ® Corporation. The original recipient of this document may duplicate this document in whole or in part for internal business purposes only, provided that this entire notice appears in all copies in duplicating any part of this document, the recipient agrees to make every reasonable effort to prevent the unauthorized use and distribution of the proprietary information. Trademarks that appear in Mentor Graphics product publications that are not owned by Mentor Graphics are trademarks of their respective owners.
Mentor Graphics Confidential
1
January 2014
Table of Contents 1.
Introduction............................................................................................................................................... 3
2.
On-Chip Clock Controller (OCC) Design Description ............................................................................... 3 2.1.
Design Placement............................................................................................................................ 3
2.2.
Schematic ........................................................................................................................................ 4
2.3.
Scan Enable Synchronization .......................................................................................................... 5
2.4.
Clock Gater Cells ............................................................................................................................. 5
2.5.
Internal Clock Definition for ATPG ................................................................................................... 5
2.6.
Shift Block ......................................................................................................................... 6
2.7.
Clock Control Operation Modes ....................................................................................................... 7
2.7.1. Functional Mode ...........................................................................................................................................7 2.7.2. Shift Mode ....................................................................................................................................................7 2.7.3. Slow Capture Mode ......................................................................................................................................8 2.7.4. Fast Capture Mode.......................................................................................................................................8 2.8.
Timing Diagrams.............................................................................................................................. 8
2.9.
RTL Description ............................................................................................................................... 10
Synthesized Gate Area ........................................................................................................................................11 3.
Test Case Description .............................................................................................................................. 12 3.1.
Test Case Design Statistics ............................................................................................................. 12
3.2.
Directory Structure ........................................................................................................................... 12
3.3.
Test Case Steps .............................................................................................................................. 13
3.4.
OCC RTL Simulation and Synthesis ................................................................................................ 13
Simulation ............................................................................................................................................................13 RTL Synthesis ......................................................................................................................................................14 3.5.
Step 1: View OCC Muxes ................................................................................................................ 14
3.6.
Step 2: Insert Clock Control Logic ................................................................................................... 15
3.7.
Step 3: Uncompressed Pattern Generation ..................................................................................... 17
3.8.
Step 4: Pattern Verification .............................................................................................................. 20
3.9.
Steps 5 to 8: Compression Logic Insertion, ATPG, and Verification ................................................ 21
Mentor Graphics Confidential
2
January 2014
1. Introduction In modern designs, on-chip clock control (OCC) circuits are commonly used to manage clocks during test to ensure the following requirements are met: Independent control by ATPG of each clock domain to improve coverage, reduce pattern count, and achieve safe clocking with minimal intervention During capture, deliver correct number of clock pulses on a per-pattern basis Cleanly switch between shift and capture clocks Enable slow or fast clocks during capture for application of slow and at-speed patterns Scan-programmable clock waveforms generated within a wrapped core are ideal for generating patterns at the core level that can be retargeted to the top level while simultaneously testing multiple cores without conflicts in how clocks are controlled within each core This application note describes a practical on-chip clock control circuit design and demonstrates its use in a test case using Tessent® ATPG tools. If the target EDT hardware uses the Low Pin Count Test (LPCT) controller, Mentor Customer for information on how to use a modified OCC design with the LPCT EDT hardware. A complete test case that demonstrates the use of this OCC design in a circuit is described in the last section. The test case is available from Mentor Graphics by ing it from the following Net page: http://net.mentor.com/reference/tutorials/index.cfm?id=MG576857
2. On-Chip Clock Controller (OCC) Design Description 2.1.
Design Placement
In order to avoid delay on the clock path due to test logic, a multiplexer should already exist on the clock source to the core flops and timed for functional behavior. The mux should be controlled by the test mode signal as shown in Figure 1 where existing logic is shown in gray.
Figure 1 – Clock Control Logic Design Placement It is important to only balance the functional clock path of the mux in order to avoid over-constraining the clock tree synthesis flow and causing excessive clock latency. For example, if using a layout tool like ICCompiler, this can be accomplished by using a set_clock_tree_exceptions -exclude_pins command and listing slow and fast clock inputs of the clock control block. In tools such as Talus from Magma, a skew group definition for each clock control block can be used. The clock control design described in this application note should supply the clock when in test mode while using the clock output of the PLL as the fast clock for at-speed capture. A top-level slow clock will be used for shift and slow capture. The reference clock supplied to the PLL is a free-running clock. It is also recommended not to flatten the clock control blocks during layout in order to ease definition of the test procedure file after layout. Mentor Graphics Confidential
3
January 2014
2.2.
Schematic
The schematic for the clock control circuit is shown in Figure 2 and the corresponding RTL can be found in section 2.9 of this document.
Figure 2 – On-Chip Clock Controller Logic Schematic The following table describes the functionality of pins at the top of the clock control block as well as some of the internal signals: Name
Direction
Description
SCAN_EN
Input
CAP_CYCLE_CONFIG [1:0]
Input
SCAN_IN
Input
FAST_CAP_MODE
Input
Selects fast or slow capture clock (0 = slow, 1 = fast)
TEST_MODE
Input
Selects test or functional mode (0 = functional, 1 = test). During functional mode, the clock control block is disabled to minimize power and cross talk.
FAST_CLK
Input
Clock for fast capture (typically output of PLL)
SLOW_CLK
Input
Clock for shift and slow capture
SCAN_OUT
Output
Scan chain output for unloading shift
CLK_OUT
Output
Controlled clock output
SCAN_EN_sync
Internal
Synchronized scan enable
SHIFT_REG_CLK_en
Internal
Clock enable signal for shift
SHIFT_REG_CLK
Internal
Clock source for shift
CLK_OUT_source
Internal
Clock source for controlled clock output
CLK_OUT_en
Internal
Clock enable signal for controlled clock output
Scan enable driven by top-level pin Configures number of clock pulses during capture cycle (maximum clock pulses = CAP_CYCLE_CONFIG + 1) as well as length of scan chain during shift Scan chain input for loading shift
Static signals that do not change during the test session can be controlled through on-chip controllers (such as JTAG) or other means in order to reduce the need for top-level pins.
Mentor Graphics Confidential
4
January 2014
2.3.
Scan Enable Synchronization
In order to synchronize the top-level scan enable signal with the fast clock (PLL output), a two-flop synchronization cell is used and clocked by FAST_CLK. This is important because scan enable is used as the trigger signal to gate the clock to the shift . The output of the synchronization cell produces a scan enable signal which is synchronized with the fast clock (SCAN_EN_sync) and can be used during fast capture test. In version 1.1 of the clock controller RTL, a flop was added on the input side of the synchronization cell and clocked by the trailing edge of SLOW_CLK. Since SCAN_EN normally fans out to the entire circuit and may arrive after FAST_CLK, the flop on SLOW_CLK ensures that SCAN_EN is not synchronized by the fast clock until SLOW_CLK is pulsed thus reducing the risk of a race condition. Note that the scan enable synchronization logic is not used for slow capture mode which uses SLOW_CLK for shift and capture. In the RTL description, the synchronization cell is described as module “tessent_sync_cell” so that it can be replaced with a technology specific synchronization cell from the appropriate library. module tessent_sync_cell (d, clk, q); input d, clk; output q; reg [1:0] R; always @ (posedge clk) begin R <= {R[0],d}; end assign q = R[1]; endmodule
In order to ensure proper DRC analysis and simulation, the output of the clock gater cell driven by the synchronization logic should be defined as a free-running internal clock. This is indicated by an arrow in Figure 2 and ensures correct simulation of the logic during load_unload and avoids DRC violations.
2.4.
Clock Gater Cells
The clock control circuit uses two clock gater cells to gate the clock for sequential elements inside and outside the circuit. Similar to the synchronization cell, the clock gater cells are described as module “tessent_cgc” so that they can be replaced with technology specific clock gater cells. module tessent_cgc (clk, te, fe, clkg); input clk, te, fe; output clkg; wire te_fe; reg latch; assign te_fe = te | fe; always @ (clk or te_fe) begin if (~clk) latch <= te_fe; end assign clkg = clk & latch; endmodule
2.5.
Internal Clock Definition for ATPG
In the ATPG dofile, the 0 input of the mux on CLK_OUT should be defined as an internal clock source as shown in Figure 2. For example: add_clocks 0 /clock_control_i/clock_mux_i/a –internal
Mentor Graphics Confidential
5
January 2014
This provides the same behavior as defining the internal clock on the output of the clock gating cell (cgc) but the mux can be easily identified by the setup script and eliminates any issues if a technology specific clock gating cell is used. With this specification, the slow shift clock is supplied to the design anytime SCAN_EN is high and should be pulsed in the shift procedures. The capture clock will be controlled by a clock control definition that describes the effects of the shift ’s condition bits on each capture cycle.
2.6.
Shift Block
Figure 3 – Shift Block Schematic The shift block contains the programmable scan cells which will be loaded during shift in order to pulse the internal clock during the cycle required by ATPG. The AND gate on the input of the shift loads zeros into the during capture to clear it. The EN output signal of the shift block is used in the clock control block (Figure 2) to turn off the fast clock to the shift once the shift has been unloaded. This ensures switching from the fast capture clock to slow shift clock without risk of glitches and disturbing the values present in the shift . It also ensures that the shift flip-flops have stable values when the ATPG tool simulates the load_unload procedure and eliminates unnecessary DRC violations. A lockup cell on the SCAN_OUT output of the shift block ensures proper shift operation when several clock control blocks are concatenated into a scan chain or when scan cells from chains with different clocks are combined with the shift flops. This is important because as described in section 2.1, each clock control block forms a locally balanced clock tree which is not balanced with any other chain segment. A key feature of the shift block is the ability to by up to 3 shift s in order to reduce the number of bits that must be specified in the patterns. This is done by setting the CAP_CYCLE_CONFIG signals per the following table: CAP_CYCLE_CONFIG[1]
CAP_CYCLE_CONFIG[0]
Maximum Clock Pulses During Capture Cycle
0
0
1
0
1
2
1
0
3
1
1
4
Mentor Graphics Confidential
6
January 2014
Limiting the number of condition bits to only those needed for the longest capture sequence reduces the overall shift cycles as well as the number of scan bits that must be specified for each pattern. Minimizing the number of specified scan cells per pattern will ensure the ATPG tool can provide the most efficient pattern set as well as the highest compression ratio when using embedded compression. In addition to limiting the overall number of specified scan cells, it is also important to limit the number of scan cells that must be specified in each shift cycle. When using compression, the output of the decompressor loads all chains simultaneously one shift cycle at a time. When stitching the shift sub-chains into the design scan chains, care should be taken to avoid the alignment of multiple condition bits into the same shift cycle. One approach is to stitch the condition s into an uncompressed scan chain which is directly loaded. For designs in which all scan chains are compressed, placing condition bits at the beginning, end or similar cell number of all scan chains should be avoided so that it is not necessary to load many specified bits in the same shift cycle.
2.7.
Clock Control Operation Modes
2.7.1. Functional Mode When operating in functional mode (TEST_MODE = 0), all clock gaters are disabled to reduce power.
Figure 4 – Test Mode Disabled 2.7.2. Shift Mode In shift mode (SCAN_EN = 1), SLOW_CLOCK is used to load/unload scan chains which include the condition bits in ShiftReg.
Figure 5 – Shift Mode Operation
Mentor Graphics Confidential
7
January 2014
2.7.3. Slow Capture Mode In slow capture mode (FAST_CAP_MODE = 0), SLOW_CLOCK is used to capture data into scan cells and to shift the condition bits in ShiftReg.
Figure 6 – Slow Capture Mode Operation 2.7.4. Fast Capture Mode In fast capture mode (FAST_CAP_MODE = 1), FAST_CLOCK is used to capture data into scan cells and to shift the condition bits in ShiftReg.
Figure 7 – Fast Capture Mode Operation
2.8.
Timing Diagrams
The timing diagram for slow speed capture (FAST_CAP_MODE = 0) is shown in Figure 8. For this example, CAP_CYCLE_CONFIG is set to “10” resulting in sequential depth of 3 (per table in section 2.6). In this mode, SLOW_CLK is used for shift as well as capture. Based on condition bits loaded into the shift , the CLK_OUT port will generate the appropriate number of slow clock pulses.
Figure 8 – Slow Speed Capture Timing Diagram Mentor Graphics Confidential
8
January 2014
In fast capture mode (FAST_CAP_MODE = 1) the waveforms in Figure 9 are generated. Similar to the previous example, CAP_CYCLE_CONFIG is set to “10” here resulting in sequential depth of 3. In this mode, the slow clock is still used for shift but the fast capture pulses on CLK_OUT are based FAST_CLK. As shown, the scan enable signal which has been synchronized to the fast clock (SCAN_EN_sync) is used to trigger the fast clock pulses on SHIFT_REG_CLK. The SHIFT_REG_CLK signal is the clock source for the shift containing the condition bits. Based on the condition bits loaded during shift, the correct number of fast clock pulses will appear on CLK_OUT.
Figure 9 – Fast Capture Timing Diagram
Mentor Graphics Confidential
9
January 2014
2.9.
RTL Description
The RTL description of the circuit described in this application note and used in the test case is shown in the following section: (* version=1.2 *) module tessent_atpg_clock_controller (FAST_CLK, SLOW_CLK, TEST_MODE, SCAN_IN, SCAN_EN, FAST_CAP_MODE, CAP_CYCLE_CONFIG, SCAN_OUT, CLK_OUT); input FAST_CLK, SLOW_CLK, TEST_MODE, SCAN_IN, SCAN_EN, FAST_CAP_MODE; input [1:0] CAP_CYCLE_CONFIG; output SCAN_OUT, CLK_OUT; wire SCAN_EN_sync; wire ShiftReg_EN; wire ShiftReg_SCAN_OUT; wire SHIFT_REG_CLK_en; wire SHIFT_REG_CLK_G; wire SHIFT_REG_CLK; wire CLK_OUT_source; wire CLK_OUT_en; wire CLK_OUT_G; reg ShiftReg_SCAN_OUT_lockup; reg SE_SLOW_CLK; always @ (negedge SLOW_CLK) begin SE_SLOW_CLK <= SCAN_EN; end tessent_sync_cell sync_cell (.d(SE_SLOW_CLK), .clk(FAST_CLK), .q(SCAN_EN_sync)); assign SHIFT_REG_CLK_en = TEST_MODE & ShiftReg_EN & ~SCAN_EN_sync; tessent_cgc cgc_SHIFT_REG_CLK (.clk(FAST_CLK), .fe(SHIFT_REG_CLK_en), .te(1'b0), .clkg(SHIFT_REG_CLK_G)); tessent_clk_mux clock_mux_SHIFT_REG_CLK (.a(SHIFT_REG_CLK_G), .b(SLOW_CLK), .s(SCAN_EN | ~FAST_CAP_MODE), .y(SHIFT_REG_CLK)); always @ (negedge SHIFT_REG_CLK) begin ShiftReg_SCAN_OUT_lockup <= ShiftReg_SCAN_OUT; end assign SCAN_OUT = ShiftReg_SCAN_OUT_lockup & SCAN_EN; assign CLK_OUT_en = ShiftReg_SCAN_OUT & (~FAST_CAP_MODE | SHIFT_REG_CLK_en) & TEST_MODE; tessent_clk_mux clock_mux_CLK_OUT_source (.a(FAST_CLK), .b(SLOW_CLK), .s(TEST_MODE & ~FAST_CAP_MODE), .y(CLK_OUT_source)); tessent_cgc cgc_CLK_OUT (.clk(CLK_OUT_source), .fe(CLK_OUT_en), .te(1'b0), .clkg(CLK_OUT_G)); tessent_clk_mux clock_mux_CLKP (.a(CLK_OUT_G), .b(SLOW_CLK), .s(SCAN_EN), .y(CLK_OUT)); tessent_atpg_cc_shift_reg ShiftReg (.CLK(SHIFT_REG_CLK), .SCAN_EN(SCAN_EN), .CAP_CYCLE_CONFIG(CAP_CYCLE_CONFIG), .EN(ShiftReg_EN), .SCAN_IN(SCAN_IN), .SCAN_OUT(ShiftReg_SCAN_OUT)); endmodule module tessent_cgc (clk, te, fe, clkg); input clk, te, fe; output clkg; wire te_fe; reg latch; assign te_fe = te | fe; always @ (clk or te_fe) begin if (~clk) latch <= te_fe; end assign clkg = clk & latch; endmodule
Mentor Graphics Confidential
10
January 2014
module tessent_sync_cell (d, clk, q); input d, clk; output q; reg [1:0] R; always @ (posedge clk) begin R <= {R[0],d}; end assign q = R[1]; endmodule module tessent_clk_mux (a, b, s, y); input a, b, s; output y; assign y = (s) ? b : a; endmodule module tessent_atpg_cc_shift_reg (CLK, SCAN_EN, CAP_CYCLE_CONFIG, EN, SCAN_IN, SCAN_OUT); input CLK, SCAN_EN, SCAN_IN; input [1:0] CAP_CYCLE_CONFIG; output EN, SCAN_OUT; reg [3:0] FF; wire [3:0] FFD; wire CAP_CONFIG_3, CAP_CONFIG_2, CAP_CONFIG_1; always @ (posedge CLK) begin FF <= FFD; end assign assign assign assign
FFD[3] FFD[2] FFD[1] FFD[0]
= = = =
SCAN_EN & SCAN_IN; (CAP_CONFIG_3 | CAP_CONFIG_2 | CAP_CONFIG_1) ? FFD[3] : FF[3]; ( CAP_CONFIG_2 | CAP_CONFIG_1) ? FFD[3] : FF[2]; ( CAP_CONFIG_1) ? FFD[3] : FF[1];
assign CAP_CONFIG_3 = (CAP_CYCLE_CONFIG == 2'b10); assign CAP_CONFIG_2 = (CAP_CYCLE_CONFIG == 2'b01); assign CAP_CONFIG_1 = (CAP_CYCLE_CONFIG == 2'b00); assign EN = |FF; assign SCAN_OUT = FF[0]; endmodule
RTL Change History Version 1.0 – Initial release Version 1.1 – Retiming flop on trailing edge of SLOW_CLK added in front of SCAN_EN synchronization cell Version 1.2 – Added AND gate on SCAN_OUT to keep scan path quiet when SCAN_EN=0
Synthesized Gate Area The synthesis library used to synthesize the OCC RTL results in 36 library cells with an approximate area of 72 2-input NAND equivalent gates.
Mentor Graphics Confidential
11
January 2014
3. Test Case Description In the test case that accompanies this application note, Tessent Shell is used for pattern generation, EDT IP creation and hardware insertion. A test case which implements the clock controller design in this application note has been verified with tool version v2013.4 and is available from Mentor Graphics (see section 1 for link). The following section describes the test case in more detail.
3.1.
Test Case Design Statistics
The example design used in this test case has the following characteristics: Gates: 10k Clocks: 3 internal clocks Scan chains: 12 o 11 design chains o 1 clock control condition bits (load only) Scan flops: 446 Total faults: 48k Test Coverage: o Stuck-at: ~99% o Transition: ~93%
3.2.
Directory Structure
The test case directory contains the following directories /design o /edt_created
o
o
Verilog, dofiles, and procedure files generated during EDT IP creation
/gates
/rtl
Gate-level netlist Synthesized clock controller /clock_controller
Clock controller RTL Simulation test benches and scripts Synthesis script
/pll
Simple RTL simulation model
/dofiles
o o
Command dofile Test procedure file
/library o /liberty
o
Liberty file
/synopsys
Compiled synthesis library file t18.db is not shipped with this test case due to licensing agreements but should be placed in this directory for use by various synthesis steps. The t18.db file can be created from the supplied liberty file (t18.lib) using Synopsys’ lc_shell library compiler.
o
/tessent
o
/verilog
Tessent cell library Simulation library
/logfiles
o
Generated log files
Mentor Graphics Confidential
12
January 2014
/patterns
o
Generated pattern files
/scripts
o
3.3.
3.4.
TCL scripts for OCC insertion and control
Test Case Steps
Step 1 o View OCC muxes in design
Step 2 o Insert clock control logic
Steps 3 – 4 o Create and simulate uncompressed patterns with internal clocks (slow and fast capture)
Steps 5 – 6 o Create, insert, and synthesize EDT hardware
Steps 7 – 8 o Create and simulate compressed patterns with internal clocks (slow and fast capture)
OCC RTL Simulation and Synthesis
Before running the test case steps in section 3.3, you may want to examine the OCC RTL in the design/rtl/clock_controller directory and run the simulations. You will likely also need to synthesize the RTL with your technology-specific library. These steps are explained in this section. Simulation Before synthesizing the clock controller RTL, it can be simulated to ensure clock pulses are generated as expected. To run the simulation, execute the following scripts in the design/rtl/clock_controller directory. run_vsim_slow_capture run_vsim_fast_capture
For slow capture test, the test bench in the referenced directory sets the CAP_CYCLE_CONFIG signals to 01 and loads the condition bits to generate a single clock pulse during capture. The waveform for slow capture test is shown in Figure 10.
Figure 10 – RTL Simulation Results for Slow Capture Test
Mentor Graphics Confidential
13
January 2014
For the fast capture test example, the CAP_CYCLE_CONFIG value is set to 11 and condition bits are setup to create 2 fast clock pulses during capture on CLK_OUT in the second and third cycles. The waveform for fast capture test is shown in Figure 11.
Figure 11 – RTL Simulation Results for Fast Capture Test RTL Synthesis After verification, the RTL is synthesized using a Design Compiler synthesis script in the design/rtl/clock_controller directory: run_synthesis
This script will run a simple synthesis based on the supplied ADK library and can be used as a template for synthesizing the RTL with your technology-specific library. The synthesis script will create the following gate-level netlist: design/gates/tessent_occ.vg
NOTE: The compiled synthesis library file t18.db is not shipped with this test case due to licensing agreements but should be placed in the library/synopsys directory for use by various synthesis steps. The t18.db file can be created from the supplied liberty file (t18.lib) using Synopsys’ lc_shell library compiler.
3.5.
Step 1: View OCC Muxes
Before inserting the clock controller into the design, you can view the muxes that already exist on the output of the PLL. Typically these muxes would be inserted and balanced as described in section 2.1. To view the PLL and clock muxes in DFTVisualizer, execute the following script: 1.display_occ_muxes
The tool will display the PLL and 3 clock muxes in DFTVisualizer’s Design window as seen in Figure 12. As shown, the test_mode signal selects the the functional test path to allow the PLL clock to drive design logic. The A1 input of each mux is left floating so that the output of the OCC can be connected and selected when test_mode is set to 1. The OCC insertion script will connect to each OCC mux and supply the slow and fast clock for test through these muxes which have already been timed and balanced.
Mentor Graphics Confidential
14
January 2014
Figure 12 – Existing PLL and OCC muxes
3.6.
Step 2: Insert Clock Control Logic
The next step is to run Tessent Shell and insert an instance of the clock control logic for each internal clock. Execute the following script to insert the clock control logic: 2.insert_clock_control
See the insertion dofile for details of various commands in Tessent Shell for insertion and design editing. #! /bin/sh -f #\ exec tessent -shell -log logfiles/$0.log -replace -dofile "$0" ################################################################### ## SCRIPT TO INSERT CLOCK CONTROLLER INTO THE DESIGN ## TESSENT VERSION 2013.4 ################################################################### set_context dft -no_rtl read_verilog design/gates/u_scan_pll.vg read_verilog design/gates/tessent_occ.vg # Read cell library to allow creation of some instances such as muxes read_cell_library library/tessent/adk.tessent_cell
Mentor Graphics Confidential
15
Execute Tessent Shell and specify log file and dofile commands
Read gate level design files and cell library
January 2014
set_current_design u set_system_mode insertion # Create collection of OCC mux input ports where OCCs should be created. For # each specified connection point, an OCC will be created and its CLK_OUT # will be connected to the specified connection point. set clock_connections [get_pins MUX_OCC*/A1] # Define scan-enable controllers set pll_clock_port set scan_enable_port set test_mode_port
and PLL clock output port that should drive the fast port on clock pll_i/pll_clock_180 test_se test_mode
# Insert an OCC block for each clock connection point in $clock_connections dofile scripts/insert_occ.tcl insert_occ $scan_enable_port $clock_connections $pll_clock_port $test_mode_port write_design -output_file design/gates/u_scan_occ.vg -exclude_modules "pll" -replace exit -force
The Tessent Shell insertion script calls the insert_occ procedure in the following TCL script (scripts/insert_occ.tcl) to perform OCC insertion and design edits: ################################################################### ## PROCEDURE TO INSERT TESSENT OCC INTO A DESIGN ## TESSENT VERSION 2013.4 ################################################################### proc insert_occ {var_scan_enable clock_connections pll_clock_port var_test_mode} { # Define top -level port names to create set var_slow_clock slow_clock set var_cap_config cap_cycle_config set var_fast_cap_mode fast_capture_mode set var_scan_in occ_control_scan_in # Create top-level ports for new create_port $var_slow_clock create_port $var_cap_config[1:0] create_port $var_fast_cap_mode create_port $var_scan_in
signals -direction -direction -direction -direction
input input input input
# Create instances of OCC for each clock in $clock_conntections and connect set num_clocks [sizeof_collection $clock_connections] for {set i 1} {$i <= $num_clocks} {incr i} { create_instance clock_control_i$i -of_module tessent_occ } create_connection $pll_clock_port [get_pins clock_control_*/FAST_CLK] create_connection $var_fast_cap_mode [get_pins clock_control_*/FAST_CAP_MODE] create_connection $var_slow_clock [get_pins clock_control_*/SLOW_CLK] create_connection $var_test_mode [get_pins clock_control_*/TEST_MODE] create_connection $var_scan_enable [get_pins clock_control_*/SCAN_EN] for {set i 1} {$i <= $num_clocks} {incr i} { create_connection $var_cap_config clock_control_i$i/CAP_CYCLE_CONFIG } # Concatenate condition bit shift s into new load-only scan chain create_connection $var_scan_in clock_control_i1/SCAN_IN for {set i 1} {$i < $num_clocks} {incr i} { create_connection clock_control_i$i/SCAN_OUT clock_control_i[expr $i + 1]/SCAN_IN } set internal_scan_out clock_control_i$num_clocks/SCAN_OUT # Connect the output of OCC blocks to the input of the clock muxes for {set i 1} {$i <= $num_clocks} {incr i} { create_connection clock_control_i$i/CLK_OUT [get_single_name [index_collection \ $clock_connections [expr $i - 1]]] }
Mentor Graphics Confidential
16
January 2014
################################################################### ## Create dofile to setup design with OCC ################################################################### set var_scan_group_name grp1 set file_dofile [open dofiles/occ_scan_setup.dofile w] puts $file_dofile "# Define slow clock created by this script. If it already exists and \ connected to the OCC" puts $file_dofile "# outside of this script, this can be removed but it should be \ defined during ATPG." puts $file_dofile "add_clocks 0 $var_slow_clock" puts $file_dofile "" puts $file_dofile "# Define clock control scan chain as load-only to reduce pins. \ Should be uncompressed if" puts $file_dofile "# number of OCCs is high to reduce specified bits." puts $file_dofile "add_scan_chains -load_only clock_control_chain $var_scan_group_name \ $var_scan_in $internal_scan_out" close $file_dofile }
After OCC insertion, the modified design is saved and patterns can be generated using internal clocks.
3.7.
Step 3: Uncompressed Pattern Generation
To run pattern generation, execute the following script at the top directory: 3.create_patterns
The script can be used to perform slow or fast clock capture and can also initialize the design using IJTAG/PDL or explicit input constraints. Invocation options described at top of the script determine which combination is used. If no arguments are specified, by default the script will initialize the design using IJTAG/PDL and create slow speed capture pattenrs. Contents of this and other included dofiles are shown here: #! /bin/sh -f #\ exec tessent -shell -dofile "$0" -arg ${1+"$@"} # Script to create patterns. Invoke with -arguments to change default settings. # - To create at-speed patterns # 3.create_patterns -arguments atpg_mode=fast_capture # - To initialize using top-level input constraints # 3.create_patterns -arguments initialization=constraints # Define default values to -specifiable parameters array set params { atpg_mode slow_capture initialization pdl } # Override defaults with -specified command line options, if specified array set params $tessent__arg set atpg_mode $params(atpg_mode) set initialization $params(initialization) # Create log file set_logfile_handling logfiles/3.create_patterns_${atpg_mode}_${initialization}.log -replace if {$initialization == "pdl"} { set_context patterns -ijtag read_verilog design/gates/u_scan_occ.vg read_cell_library library/tessent/adk.tessent_cell read_icl design/gates/tessent_occ.icl
Read design netlist and ICL file to setup design for initialization with IJTAG/PDL
add_black_box -module pll
Mentor Graphics Confidential
17
January 2014
report_module_matching -icl Run DRC to find each instance of Tessent OCC and learn connectivity to top-level ports
set_system_mode analysis set_system_mode setup set_context patterns -scan
# Read the PDL file that defines necessary constrain values on boundary of OCC module source design/gates/tessent_occ.pdl # Apply the constrain values in PDL to all instances of the OCC if {$atpg_mode == "slow_capture"} { set fast_cap_mode_value 0 } elseif {$atpg_mode == "fast_capture"} { set fast_cap_mode_value 1 } else { error "Invalid command line argument '$atpg_mode' for 'atpg_mode '. Use '-arguments atpg_mode=
' to specify. Valid values are 'slow_capture' and 'fast_capture'" } foreach occ_inst [get_name_list [get_icl_instances -of_module tessent_occ]] { set_test_setup_icall [list $occ_inst.setup fast_cap_mode $fast_cap_mode_value cap_cycle_config 4] -append } } elseif {$initialization == "constraints"} { # The above IJTAG commands automatically create the below 4 input constraints by tracing # these control signals from the boundary of each OCC instnace to the top of the design # and enforcing the values defined in the PDL file for each port. This eliminates the # need for you to map these signals and setting the input constraints manually. This # method also verifies that each OCC's control signsal is correctly connected to top. # Alternatively, you can use the following explicit commands to constrain the top level # ports assuming that you ensure the connections to all OCCs are correct. set_context patterns -scan read_verilog design/gates/u_scan_occ.vg read_cell_library library/tessent/adk.tessent_cell add_black_box -module pll add_input_constraints -c1 test_mode add_input_constraints -c1 cap_cycle_config[1] add_input_constraints -c1 cap_cycle_config[0] if {$atpg_mode == "slow_capture"} { add_input_constraints -c0 fast_capture_mode } elseif {$atpg_mode == "fast_capture"} { add_input_constraints -c1 fast_capture_mode } else { error "Invalid command line argument '$atpg_mode' for 'atpg_mode '. Use '-arguments atpg_mode=
' to specify. Valid values are 'slow_capture' and 'fast_capture'" } } else { error "Invalid command line argument '$initialization' for 'initalization '. Use '-arguments initialization=
' to specify. Valid values are 'pdl' and 'constraints'" } add_input_constraints -c0 test_se # Using either method (IJTAG or explicit add_input_constraint commands) will result # in the following report in ANALYSIS mode: #ANALYSIS> report_input_constraints #// Primary Input C-Type Hold No-Z Slow-Pad #// ------------------- ------ ---- ---- -------#// rst_in C1 N/A No N/A #// test_se C0 No No N/A #// test_mode C1 No No N/A #// cap_cycle_config[1] C1 No No N/A #// cap_cycle_config[0] C1 No No N/A #// fast_capture_mode C0 No No N/A # Define scan chains add_scan_group grp1 dofiles/atpg.testproc dofile dofiles/scan_setup.dofile dofile dofiles/occ_scan_setup.dofile dofile dofiles/pll_setup.dofile
Mentor Graphics Confidential
18
January 2014
if {$atpg_mode == "fast_capture"} { set_fault_type transition -no_shift_launch set_output_masks on add_input_constraints -all -hold } # Define internal clocks for clock controller dofile scripts/tessent_occ.tcl tessent_occ_config $atpg_mode # Run Design Rule Checks set_system_mode analysis report_input_constraints
For at-speed test using fast clock capture, setup fault type, mask outputs, and constrain inputs
Script and procedure call to find all Tessent OCCs in design and automatically define internal clocks and setup for ATPG
Procedure call to configure design based on DRC results
tessent_occ_config $atpg_mode
if {$atpg_mode == "fast_capture"} { set_external_capture_options -capture_procedure ext_fast_cap_proc } # Run ATPG create_patterns # Save pattern (SIM_KEEP_PATH includes full pattern file pathnames in test bench) report_patterns > patterns/patterns_report_$atpg_mode.txt write_patterns patterns/pat1_${atpg_mode}_parallel.v -verilog -parallel -parameter_list {SIM_KEEP_PATH 1} -replace set_pattern_filtering -sample 2 write_patterns patterns/pat1_${atpg_mode}_serial.v -verilog -serial -parameter_list {SIM_KEEP_PATH 1} -replace exit
Once patterns are generated, test benches are saved for simulation against Verilog. The SIM_KEEP_PATH parameter ensures that the full pathnames of pattern files are saved in the test bench so that it is not mandatory to run the simulation from the patterns directory. The test procedure file used for ATPG is common for all test modes and is stored in the file dofiles/atpg.testproc. The content of this file is shown below: // // Test Procedure File // timeplate tmp1 = force_pi 0 ; measure_po 2 ; pulse_clock 16 32; period 64 ; end;
Timeplate globally defines force, measure, and pulse timing for all signals. Note the pulse_clock statement is new in 2013.4 release.
procedure test_setup = timeplate tmp1 ; cycle = force test_mode 1; pulse rst_in; pulse slow_clock; end; end; procedure shift = timeplate tmp1 ; cycle = force_sci ; measure_sco ; pulse slow_clock; pulse int_clk1; pulse int_clk2; pulse int_clk3;
Mentor Graphics Confidential
19
January 2014
end; end; procedure load_unload = scan_group grp1 ; timeplate tmp1 ; cycle = force test_se 1; end; apply shift 44; end; procedure external_capture ext_fast_cap_proc = timeplate tmp1 ; cycle = force_pi ; pulse slow_clock; end; end;
The external_capture procedure is used for fast clock capture to ensure a pulse on slow_clock at the start of each pattern. See section 2.8 and Figure 9 for an explanation of why this pulse is needed.
Most of the test procedure file is typical to most scan design. Additionally, the test procedure file contains the external capture procedure ext_fast_cap_proc to ensure proper pulses on external clocks are saved to the pattern file when fast clock is used for capture.
3.8.
Step 4: Pattern Verification
The next step is to simulate the generated patterns to ensure no mismatches exist. The following script simulates serial and paralel Verilog test benches in various test modes: 4.simulate_patterns
The script compiles the design, library, and patterns using ModelSim and verifes that all patterns (serial and parallel) simulate with no mismatches. The simulation waveform for slow capture pattern number 0 is shown in Figure 13:
Figure 13 – Pattern Simulation Results for Slow Capture Test The last 3 signals are the output of the clock control blocks which show a single pulse on the output of clock_control_i2/CLK_OUT. This matches the output of the report_patterns command which is stored in the file patterns/patterns_report_slow_capture.txt. The content of this file for the first few pattersn is shown here: // // // // // // // // //
pattern # --------0 1 2 3 4 5
type ------basic basic basic basic basic basic
cycles -----1 1 1 1 1 1
loads ----1 1 1 1 1 1
...
capture_clock_sequence --------------------------------------------[slow_clock,int_clk2,int_pll] [slow_clock,int_clk2,int_pll] [slow_clock,int_clk3,int_pll] [slow_clock,int_clk2,int_pll] [slow_clock,int_clk2,int_pll] [slow_clock,int_clk2,int_pll]
We can see that scan pattern number 0 pulses the top level slow_clock and internal clocks int_clk_2 and int_pll. Note that the top level reference_clock which is a free-running clock is also pulsed in the Mentor Graphics Confidential
20
January 2014
test bench but because it is an asynchronous free-running clock it is not reported in the output of the report_patterns command. Similar observations can be made for fast capture pattern number 0 which pulses in_clk2 followed by int_clk2. The waveform for this pattern is shown in Figure 14:
Figure 14 – Pattern Simulation Results for Fast Capture Test The corresponding report_patterns output is shown below: // // // //
3.9.
pattern # --------0
type ------clock_sequential
cycles -----2
//
1
clock_sequential
2
//
2
clock_sequential
2
//
3
clock_sequential
2
//
4
clock_sequential
2
//
5
clock_sequential
2
loads ... capture_clock_sequence -----------------------------------------1 [int_clkg_3,int_clk2,int_clkg_2,int_clkg_1,int_pll] [int_clkg_3,int_clk2,int_clkg_2,int_clkg_1,int_pll] 1 [int_clkg_3,int_clk2,int_clkg_2,int_clkg_1,int_pll] [int_clkg_3,int_clk2,int_clkg_2,int_clkg_1,int_pll] 1 [int_clkg_3,int_clk2,int_clkg_2,int_clkg_1,int_pll] [int_clk3,int_clkg_3,int_clkg_2,int_clkg_1,int_pll] 1 [int_clkg_3,int_clk2,int_clkg_2,int_clkg_1,int_pll] [int_clkg_3,int_clk2,int_clkg_2,int_clkg_1,int_pll] 1 [int_clkg_3,int_clk2,int_clkg_2,int_clkg_1,int_pll] [int_clkg_3,int_clk2,int_clkg_2,int_clkg_1,int_pll] 1 [int_clkg_3,int_clk2,int_clkg_2,int_clkg_1,int_pll] [int_clkg_3,int_clk2,int_clkg_2,int_clkg_1,int_pll]
Steps 5 to 8: Compression Logic Insertion, ATPG, and Verification
The next steps in the test case demonstrate the use of Tessent Shell to create and insert EDT compression logic [step 5] and to synthesize the created RTL with Design Compiler [step 6]: 5.insert_edt_ip 6.synthesize_edt_ip
The IP creation step runs Tessent Shell with slow clock and fast clock setup files in order to automatically create the ATPG files for both clock speeds. Since only one compression hardware design file is needed, only the IP creation step with slow clock writes the compression hardware to a file. This file is synthesized in step 6. NOTE: The compiled synthesis library file t18.db is not shipped with this test case due to licensing agreements but should be placed in the library/synopsys directory for use by various synthesis steps. The t18.db file can be created from the supplied liberty file (t18.lib) using Synopsys’ lc_shell library compiler. The next step is to create compressed patterns using the slow and fast capture clocks [step 7]: 7.create_edt_patterns
Mentor Graphics Confidential
21
January 2014
7.create_edt_patterns atpg_mode=fast_capture
Similar to the 3.create_patterns script, the default behavior of the pattern generation script is to use the ICL and PDL descriptions of the OCC to constrain the inputs of each OCC. This simplifies the flow by automatically finding all OCCs in the design and ensuring that their control inputs defined in the PDL are properly constrainted. An alternative method is to use explicit input constraints in the dofile but this requires the to ensure the OCCs are connected to the top and works for directly connected pins but may be more complicated in other cases. The ICL/PDL method is a more general solution which also handles hardware that is initialized through IJTAG or TAP controllers. In order to use input constraints in the pattern generation script, the initialization=constraints argument can be used at command line. For example: 7.create_edt_patterns initialization=constraints 7.create_edt_patterns initialization=constraints atpg_mode=fast_capture
The final step is to simulate the compressed patterns to ensure no mismatches exist. Script 8 simulates all compressed patterns: 8.simulate_edt_patterns
To run all steps in the test case, you can use the 0.run_all_steps script but as stated earlier, the synthesis library is not part of the test case and will require proper setup for running step 5 to synthesize the EDT hardware. To obtain the complete test case for the flow described in this application note, use the link in section 1 of this document. If the target EDT hardware uses the Low Pin Count Test (LPCT) controller, Mentor Customer for information on how to use a modified OCC design with the LPCT EDT hardware.
Mentor Graphics Confidential
22
January 2014
A Practical On-Chip Clock Controller Circuit Design & Example Tessent® ATPG Test Case
January 2014
©Copyright Mentor Graphics Corporation 1995-2014. All rights reserved. This document contains information that is proprietary to Mentor Graphics ® Corporation. The original recipient of this document may duplicate this document in whole or in part for internal business purposes only, provided that this entire notice appears in all copies in duplicating any part of this document, the recipient agrees to make every reasonable effort to prevent the unauthorized use and distribution of the proprietary information. Trademarks that appear in Mentor Graphics product publications that are not owned by Mentor Graphics are trademarks of their respective owners.
Mentor Graphics Confidential
1
January 2014
Table of Contents 1.
Introduction............................................................................................................................................... 3
2.
On-Chip Clock Controller (OCC) Design Description ............................................................................... 3 2.1.
Design Placement............................................................................................................................ 3
2.2.
Schematic ........................................................................................................................................ 4
2.3.
Scan Enable Synchronization .......................................................................................................... 5
2.4.
Clock Gater Cells ............................................................................................................................. 5
2.5.
Internal Clock Definition for ATPG ................................................................................................... 5
2.6.
Shift Block ......................................................................................................................... 6
2.7.
Clock Control Operation Modes ....................................................................................................... 7
2.7.1. Functional Mode ...........................................................................................................................................7 2.7.2. Shift Mode ....................................................................................................................................................7 2.7.3. Slow Capture Mode ......................................................................................................................................8 2.7.4. Fast Capture Mode.......................................................................................................................................8 2.8.
Timing Diagrams.............................................................................................................................. 8
2.9.
RTL Description ............................................................................................................................... 10
Synthesized Gate Area ........................................................................................................................................11 3.
Test Case Description .............................................................................................................................. 12 3.1.
Test Case Design Statistics ............................................................................................................. 12
3.2.
Directory Structure ........................................................................................................................... 12
3.3.
Test Case Steps .............................................................................................................................. 13
3.4.
OCC RTL Simulation and Synthesis ................................................................................................ 13
Simulation ............................................................................................................................................................13 RTL Synthesis ......................................................................................................................................................14 3.5.
Step 1: View OCC Muxes ................................................................................................................ 14
3.6.
Step 2: Insert Clock Control Logic ................................................................................................... 15
3.7.
Step 3: Uncompressed Pattern Generation ..................................................................................... 17
3.8.
Step 4: Pattern Verification .............................................................................................................. 20
3.9.
Steps 5 to 8: Compression Logic Insertion, ATPG, and Verification ................................................ 21
Mentor Graphics Confidential
2
January 2014
1. Introduction In modern designs, on-chip clock control (OCC) circuits are commonly used to manage clocks during test to ensure the following requirements are met: Independent control by ATPG of each clock domain to improve coverage, reduce pattern count, and achieve safe clocking with minimal intervention During capture, deliver correct number of clock pulses on a per-pattern basis Cleanly switch between shift and capture clocks Enable slow or fast clocks during capture for application of slow and at-speed patterns Scan-programmable clock waveforms generated within a wrapped core are ideal for generating patterns at the core level that can be retargeted to the top level while simultaneously testing multiple cores without conflicts in how clocks are controlled within each core This application note describes a practical on-chip clock control circuit design and demonstrates its use in a test case using Tessent® ATPG tools. If the target EDT hardware uses the Low Pin Count Test (LPCT) controller, Mentor Customer for information on how to use a modified OCC design with the LPCT EDT hardware. A complete test case that demonstrates the use of this OCC design in a circuit is described in the last section. The test case is available from Mentor Graphics by ing it from the following Net page: http://net.mentor.com/reference/tutorials/index.cfm?id=MG576857
2. On-Chip Clock Controller (OCC) Design Description 2.1.
Design Placement
In order to avoid delay on the clock path due to test logic, a multiplexer should already exist on the clock source to the core flops and timed for functional behavior. The mux should be controlled by the test mode signal as shown in Figure 1 where existing logic is shown in gray.
Figure 1 – Clock Control Logic Design Placement It is important to only balance the functional clock path of the mux in order to avoid over-constraining the clock tree synthesis flow and causing excessive clock latency. For example, if using a layout tool like ICCompiler, this can be accomplished by using a set_clock_tree_exceptions -exclude_pins command and listing slow and fast clock inputs of the clock control block. In tools such as Talus from Magma, a skew group definition for each clock control block can be used. The clock control design described in this application note should supply the clock when in test mode while using the clock output of the PLL as the fast clock for at-speed capture. A top-level slow clock will be used for shift and slow capture. The reference clock supplied to the PLL is a free-running clock. It is also recommended not to flatten the clock control blocks during layout in order to ease definition of the test procedure file after layout. Mentor Graphics Confidential
3
January 2014
2.2.
Schematic
The schematic for the clock control circuit is shown in Figure 2 and the corresponding RTL can be found in section 2.9 of this document.
Figure 2 – On-Chip Clock Controller Logic Schematic The following table describes the functionality of pins at the top of the clock control block as well as some of the internal signals: Name
Direction
Description
SCAN_EN
Input
CAP_CYCLE_CONFIG [1:0]
Input
SCAN_IN
Input
FAST_CAP_MODE
Input
Selects fast or slow capture clock (0 = slow, 1 = fast)
TEST_MODE
Input
Selects test or functional mode (0 = functional, 1 = test). During functional mode, the clock control block is disabled to minimize power and cross talk.
FAST_CLK
Input
Clock for fast capture (typically output of PLL)
SLOW_CLK
Input
Clock for shift and slow capture
SCAN_OUT
Output
Scan chain output for unloading shift
CLK_OUT
Output
Controlled clock output
SCAN_EN_sync
Internal
Synchronized scan enable
SHIFT_REG_CLK_en
Internal
Clock enable signal for shift
SHIFT_REG_CLK
Internal
Clock source for shift
CLK_OUT_source
Internal
Clock source for controlled clock output
CLK_OUT_en
Internal
Clock enable signal for controlled clock output
Scan enable driven by top-level pin Configures number of clock pulses during capture cycle (maximum clock pulses = CAP_CYCLE_CONFIG + 1) as well as length of scan chain during shift Scan chain input for loading shift
Static signals that do not change during the test session can be controlled through on-chip controllers (such as JTAG) or other means in order to reduce the need for top-level pins.
Mentor Graphics Confidential
4
January 2014
2.3.
Scan Enable Synchronization
In order to synchronize the top-level scan enable signal with the fast clock (PLL output), a two-flop synchronization cell is used and clocked by FAST_CLK. This is important because scan enable is used as the trigger signal to gate the clock to the shift . The output of the synchronization cell produces a scan enable signal which is synchronized with the fast clock (SCAN_EN_sync) and can be used during fast capture test. In version 1.1 of the clock controller RTL, a flop was added on the input side of the synchronization cell and clocked by the trailing edge of SLOW_CLK. Since SCAN_EN normally fans out to the entire circuit and may arrive after FAST_CLK, the flop on SLOW_CLK ensures that SCAN_EN is not synchronized by the fast clock until SLOW_CLK is pulsed thus reducing the risk of a race condition. Note that the scan enable synchronization logic is not used for slow capture mode which uses SLOW_CLK for shift and capture. In the RTL description, the synchronization cell is described as module “tessent_sync_cell” so that it can be replaced with a technology specific synchronization cell from the appropriate library. module tessent_sync_cell (d, clk, q); input d, clk; output q; reg [1:0] R; always @ (posedge clk) begin R <= {R[0],d}; end assign q = R[1]; endmodule
In order to ensure proper DRC analysis and simulation, the output of the clock gater cell driven by the synchronization logic should be defined as a free-running internal clock. This is indicated by an arrow in Figure 2 and ensures correct simulation of the logic during load_unload and avoids DRC violations.
2.4.
Clock Gater Cells
The clock control circuit uses two clock gater cells to gate the clock for sequential elements inside and outside the circuit. Similar to the synchronization cell, the clock gater cells are described as module “tessent_cgc” so that they can be replaced with technology specific clock gater cells. module tessent_cgc (clk, te, fe, clkg); input clk, te, fe; output clkg; wire te_fe; reg latch; assign te_fe = te | fe; always @ (clk or te_fe) begin if (~clk) latch <= te_fe; end assign clkg = clk & latch; endmodule
2.5.
Internal Clock Definition for ATPG
In the ATPG dofile, the 0 input of the mux on CLK_OUT should be defined as an internal clock source as shown in Figure 2. For example: add_clocks 0 /clock_control_i/clock_mux_i/a –internal
Mentor Graphics Confidential
5
January 2014
This provides the same behavior as defining the internal clock on the output of the clock gating cell (cgc) but the mux can be easily identified by the setup script and eliminates any issues if a technology specific clock gating cell is used. With this specification, the slow shift clock is supplied to the design anytime SCAN_EN is high and should be pulsed in the shift procedures. The capture clock will be controlled by a clock control definition that describes the effects of the shift ’s condition bits on each capture cycle.
2.6.
Shift Block
Figure 3 – Shift Block Schematic The shift block contains the programmable scan cells which will be loaded during shift in order to pulse the internal clock during the cycle required by ATPG. The AND gate on the input of the shift loads zeros into the during capture to clear it. The EN output signal of the shift block is used in the clock control block (Figure 2) to turn off the fast clock to the shift once the shift has been unloaded. This ensures switching from the fast capture clock to slow shift clock without risk of glitches and disturbing the values present in the shift . It also ensures that the shift flip-flops have stable values when the ATPG tool simulates the load_unload procedure and eliminates unnecessary DRC violations. A lockup cell on the SCAN_OUT output of the shift block ensures proper shift operation when several clock control blocks are concatenated into a scan chain or when scan cells from chains with different clocks are combined with the shift flops. This is important because as described in section 2.1, each clock control block forms a locally balanced clock tree which is not balanced with any other chain segment. A key feature of the shift block is the ability to by up to 3 shift s in order to reduce the number of bits that must be specified in the patterns. This is done by setting the CAP_CYCLE_CONFIG signals per the following table: CAP_CYCLE_CONFIG[1]
CAP_CYCLE_CONFIG[0]
Maximum Clock Pulses During Capture Cycle
0
0
1
0
1
2
1
0
3
1
1
4
Mentor Graphics Confidential
6
January 2014
Limiting the number of condition bits to only those needed for the longest capture sequence reduces the overall shift cycles as well as the number of scan bits that must be specified for each pattern. Minimizing the number of specified scan cells per pattern will ensure the ATPG tool can provide the most efficient pattern set as well as the highest compression ratio when using embedded compression. In addition to limiting the overall number of specified scan cells, it is also important to limit the number of scan cells that must be specified in each shift cycle. When using compression, the output of the decompressor loads all chains simultaneously one shift cycle at a time. When stitching the shift sub-chains into the design scan chains, care should be taken to avoid the alignment of multiple condition bits into the same shift cycle. One approach is to stitch the condition s into an uncompressed scan chain which is directly loaded. For designs in which all scan chains are compressed, placing condition bits at the beginning, end or similar cell number of all scan chains should be avoided so that it is not necessary to load many specified bits in the same shift cycle.
2.7.
Clock Control Operation Modes
2.7.1. Functional Mode When operating in functional mode (TEST_MODE = 0), all clock gaters are disabled to reduce power.
Figure 4 – Test Mode Disabled 2.7.2. Shift Mode In shift mode (SCAN_EN = 1), SLOW_CLOCK is used to load/unload scan chains which include the condition bits in ShiftReg.
Figure 5 – Shift Mode Operation
Mentor Graphics Confidential
7
January 2014
2.7.3. Slow Capture Mode In slow capture mode (FAST_CAP_MODE = 0), SLOW_CLOCK is used to capture data into scan cells and to shift the condition bits in ShiftReg.
Figure 6 – Slow Capture Mode Operation 2.7.4. Fast Capture Mode In fast capture mode (FAST_CAP_MODE = 1), FAST_CLOCK is used to capture data into scan cells and to shift the condition bits in ShiftReg.
Figure 7 – Fast Capture Mode Operation
2.8.
Timing Diagrams
The timing diagram for slow speed capture (FAST_CAP_MODE = 0) is shown in Figure 8. For this example, CAP_CYCLE_CONFIG is set to “10” resulting in sequential depth of 3 (per table in section 2.6). In this mode, SLOW_CLK is used for shift as well as capture. Based on condition bits loaded into the shift , the CLK_OUT port will generate the appropriate number of slow clock pulses.
Figure 8 – Slow Speed Capture Timing Diagram Mentor Graphics Confidential
8
January 2014
In fast capture mode (FAST_CAP_MODE = 1) the waveforms in Figure 9 are generated. Similar to the previous example, CAP_CYCLE_CONFIG is set to “10” here resulting in sequential depth of 3. In this mode, the slow clock is still used for shift but the fast capture pulses on CLK_OUT are based FAST_CLK. As shown, the scan enable signal which has been synchronized to the fast clock (SCAN_EN_sync) is used to trigger the fast clock pulses on SHIFT_REG_CLK. The SHIFT_REG_CLK signal is the clock source for the shift containing the condition bits. Based on the condition bits loaded during shift, the correct number of fast clock pulses will appear on CLK_OUT.
Figure 9 – Fast Capture Timing Diagram
Mentor Graphics Confidential
9
January 2014
2.9.
RTL Description
The RTL description of the circuit described in this application note and used in the test case is shown in the following section: (* version=1.2 *) module tessent_atpg_clock_controller (FAST_CLK, SLOW_CLK, TEST_MODE, SCAN_IN, SCAN_EN, FAST_CAP_MODE, CAP_CYCLE_CONFIG, SCAN_OUT, CLK_OUT); input FAST_CLK, SLOW_CLK, TEST_MODE, SCAN_IN, SCAN_EN, FAST_CAP_MODE; input [1:0] CAP_CYCLE_CONFIG; output SCAN_OUT, CLK_OUT; wire SCAN_EN_sync; wire ShiftReg_EN; wire ShiftReg_SCAN_OUT; wire SHIFT_REG_CLK_en; wire SHIFT_REG_CLK_G; wire SHIFT_REG_CLK; wire CLK_OUT_source; wire CLK_OUT_en; wire CLK_OUT_G; reg ShiftReg_SCAN_OUT_lockup; reg SE_SLOW_CLK; always @ (negedge SLOW_CLK) begin SE_SLOW_CLK <= SCAN_EN; end tessent_sync_cell sync_cell (.d(SE_SLOW_CLK), .clk(FAST_CLK), .q(SCAN_EN_sync)); assign SHIFT_REG_CLK_en = TEST_MODE & ShiftReg_EN & ~SCAN_EN_sync; tessent_cgc cgc_SHIFT_REG_CLK (.clk(FAST_CLK), .fe(SHIFT_REG_CLK_en), .te(1'b0), .clkg(SHIFT_REG_CLK_G)); tessent_clk_mux clock_mux_SHIFT_REG_CLK (.a(SHIFT_REG_CLK_G), .b(SLOW_CLK), .s(SCAN_EN | ~FAST_CAP_MODE), .y(SHIFT_REG_CLK)); always @ (negedge SHIFT_REG_CLK) begin ShiftReg_SCAN_OUT_lockup <= ShiftReg_SCAN_OUT; end assign SCAN_OUT = ShiftReg_SCAN_OUT_lockup & SCAN_EN; assign CLK_OUT_en = ShiftReg_SCAN_OUT & (~FAST_CAP_MODE | SHIFT_REG_CLK_en) & TEST_MODE; tessent_clk_mux clock_mux_CLK_OUT_source (.a(FAST_CLK), .b(SLOW_CLK), .s(TEST_MODE & ~FAST_CAP_MODE), .y(CLK_OUT_source)); tessent_cgc cgc_CLK_OUT (.clk(CLK_OUT_source), .fe(CLK_OUT_en), .te(1'b0), .clkg(CLK_OUT_G)); tessent_clk_mux clock_mux_CLKP (.a(CLK_OUT_G), .b(SLOW_CLK), .s(SCAN_EN), .y(CLK_OUT)); tessent_atpg_cc_shift_reg ShiftReg (.CLK(SHIFT_REG_CLK), .SCAN_EN(SCAN_EN), .CAP_CYCLE_CONFIG(CAP_CYCLE_CONFIG), .EN(ShiftReg_EN), .SCAN_IN(SCAN_IN), .SCAN_OUT(ShiftReg_SCAN_OUT)); endmodule module tessent_cgc (clk, te, fe, clkg); input clk, te, fe; output clkg; wire te_fe; reg latch; assign te_fe = te | fe; always @ (clk or te_fe) begin if (~clk) latch <= te_fe; end assign clkg = clk & latch; endmodule
Mentor Graphics Confidential
10
January 2014
module tessent_sync_cell (d, clk, q); input d, clk; output q; reg [1:0] R; always @ (posedge clk) begin R <= {R[0],d}; end assign q = R[1]; endmodule module tessent_clk_mux (a, b, s, y); input a, b, s; output y; assign y = (s) ? b : a; endmodule module tessent_atpg_cc_shift_reg (CLK, SCAN_EN, CAP_CYCLE_CONFIG, EN, SCAN_IN, SCAN_OUT); input CLK, SCAN_EN, SCAN_IN; input [1:0] CAP_CYCLE_CONFIG; output EN, SCAN_OUT; reg [3:0] FF; wire [3:0] FFD; wire CAP_CONFIG_3, CAP_CONFIG_2, CAP_CONFIG_1; always @ (posedge CLK) begin FF <= FFD; end assign assign assign assign
FFD[3] FFD[2] FFD[1] FFD[0]
= = = =
SCAN_EN & SCAN_IN; (CAP_CONFIG_3 | CAP_CONFIG_2 | CAP_CONFIG_1) ? FFD[3] : FF[3]; ( CAP_CONFIG_2 | CAP_CONFIG_1) ? FFD[3] : FF[2]; ( CAP_CONFIG_1) ? FFD[3] : FF[1];
assign CAP_CONFIG_3 = (CAP_CYCLE_CONFIG == 2'b10); assign CAP_CONFIG_2 = (CAP_CYCLE_CONFIG == 2'b01); assign CAP_CONFIG_1 = (CAP_CYCLE_CONFIG == 2'b00); assign EN = |FF; assign SCAN_OUT = FF[0]; endmodule
RTL Change History Version 1.0 – Initial release Version 1.1 – Retiming flop on trailing edge of SLOW_CLK added in front of SCAN_EN synchronization cell Version 1.2 – Added AND gate on SCAN_OUT to keep scan path quiet when SCAN_EN=0
Synthesized Gate Area The synthesis library used to synthesize the OCC RTL results in 36 library cells with an approximate area of 72 2-input NAND equivalent gates.
Mentor Graphics Confidential
11
January 2014
3. Test Case Description In the test case that accompanies this application note, Tessent Shell is used for pattern generation, EDT IP creation and hardware insertion. A test case which implements the clock controller design in this application note has been verified with tool version v2013.4 and is available from Mentor Graphics (see section 1 for link). The following section describes the test case in more detail.
3.1.
Test Case Design Statistics
The example design used in this test case has the following characteristics: Gates: 10k Clocks: 3 internal clocks Scan chains: 12 o 11 design chains o 1 clock control condition bits (load only) Scan flops: 446 Total faults: 48k Test Coverage: o Stuck-at: ~99% o Transition: ~93%
3.2.
Directory Structure
The test case directory contains the following directories /design o /edt_created
o
o
Verilog, dofiles, and procedure files generated during EDT IP creation
/gates
/rtl
Gate-level netlist Synthesized clock controller /clock_controller
Clock controller RTL Simulation test benches and scripts Synthesis script
/pll
Simple RTL simulation model
/dofiles
o o
Command dofile Test procedure file
/library o /liberty
o
Liberty file
/synopsys
Compiled synthesis library file t18.db is not shipped with this test case due to licensing agreements but should be placed in this directory for use by various synthesis steps. The t18.db file can be created from the supplied liberty file (t18.lib) using Synopsys’ lc_shell library compiler.
o
/tessent
o
/verilog
Tessent cell library Simulation library
/logfiles
o
Generated log files
Mentor Graphics Confidential
12
January 2014
/patterns
o
Generated pattern files
/scripts
o
3.3.
3.4.
TCL scripts for OCC insertion and control
Test Case Steps
Step 1 o View OCC muxes in design
Step 2 o Insert clock control logic
Steps 3 – 4 o Create and simulate uncompressed patterns with internal clocks (slow and fast capture)
Steps 5 – 6 o Create, insert, and synthesize EDT hardware
Steps 7 – 8 o Create and simulate compressed patterns with internal clocks (slow and fast capture)
OCC RTL Simulation and Synthesis
Before running the test case steps in section 3.3, you may want to examine the OCC RTL in the design/rtl/clock_controller directory and run the simulations. You will likely also need to synthesize the RTL with your technology-specific library. These steps are explained in this section. Simulation Before synthesizing the clock controller RTL, it can be simulated to ensure clock pulses are generated as expected. To run the simulation, execute the following scripts in the design/rtl/clock_controller directory. run_vsim_slow_capture run_vsim_fast_capture
For slow capture test, the test bench in the referenced directory sets the CAP_CYCLE_CONFIG signals to 01 and loads the condition bits to generate a single clock pulse during capture. The waveform for slow capture test is shown in Figure 10.
Figure 10 – RTL Simulation Results for Slow Capture Test
Mentor Graphics Confidential
13
January 2014
For the fast capture test example, the CAP_CYCLE_CONFIG value is set to 11 and condition bits are setup to create 2 fast clock pulses during capture on CLK_OUT in the second and third cycles. The waveform for fast capture test is shown in Figure 11.
Figure 11 – RTL Simulation Results for Fast Capture Test RTL Synthesis After verification, the RTL is synthesized using a Design Compiler synthesis script in the design/rtl/clock_controller directory: run_synthesis
This script will run a simple synthesis based on the supplied ADK library and can be used as a template for synthesizing the RTL with your technology-specific library. The synthesis script will create the following gate-level netlist: design/gates/tessent_occ.vg
NOTE: The compiled synthesis library file t18.db is not shipped with this test case due to licensing agreements but should be placed in the library/synopsys directory for use by various synthesis steps. The t18.db file can be created from the supplied liberty file (t18.lib) using Synopsys’ lc_shell library compiler.
3.5.
Step 1: View OCC Muxes
Before inserting the clock controller into the design, you can view the muxes that already exist on the output of the PLL. Typically these muxes would be inserted and balanced as described in section 2.1. To view the PLL and clock muxes in DFTVisualizer, execute the following script: 1.display_occ_muxes
The tool will display the PLL and 3 clock muxes in DFTVisualizer’s Design window as seen in Figure 12. As shown, the test_mode signal selects the the functional test path to allow the PLL clock to drive design logic. The A1 input of each mux is left floating so that the output of the OCC can be connected and selected when test_mode is set to 1. The OCC insertion script will connect to each OCC mux and supply the slow and fast clock for test through these muxes which have already been timed and balanced.
Mentor Graphics Confidential
14
January 2014
Figure 12 – Existing PLL and OCC muxes
3.6.
Step 2: Insert Clock Control Logic
The next step is to run Tessent Shell and insert an instance of the clock control logic for each internal clock. Execute the following script to insert the clock control logic: 2.insert_clock_control
See the insertion dofile for details of various commands in Tessent Shell for insertion and design editing. #! /bin/sh -f #\ exec tessent -shell -log logfiles/$0.log -replace -dofile "$0" ################################################################### ## SCRIPT TO INSERT CLOCK CONTROLLER INTO THE DESIGN ## TESSENT VERSION 2013.4 ################################################################### set_context dft -no_rtl read_verilog design/gates/u_scan_pll.vg read_verilog design/gates/tessent_occ.vg # Read cell library to allow creation of some instances such as muxes read_cell_library library/tessent/adk.tessent_cell
Mentor Graphics Confidential
15
Execute Tessent Shell and specify log file and dofile commands
Read gate level design files and cell library
January 2014
set_current_design u set_system_mode insertion # Create collection of OCC mux input ports where OCCs should be created. For # each specified connection point, an OCC will be created and its CLK_OUT # will be connected to the specified connection point. set clock_connections [get_pins MUX_OCC*/A1] # Define scan-enable controllers set pll_clock_port set scan_enable_port set test_mode_port
and PLL clock output port that should drive the fast port on clock pll_i/pll_clock_180 test_se test_mode
# Insert an OCC block for each clock connection point in $clock_connections dofile scripts/insert_occ.tcl insert_occ $scan_enable_port $clock_connections $pll_clock_port $test_mode_port write_design -output_file design/gates/u_scan_occ.vg -exclude_modules "pll" -replace exit -force
The Tessent Shell insertion script calls the insert_occ procedure in the following TCL script (scripts/insert_occ.tcl) to perform OCC insertion and design edits: ################################################################### ## PROCEDURE TO INSERT TESSENT OCC INTO A DESIGN ## TESSENT VERSION 2013.4 ################################################################### proc insert_occ {var_scan_enable clock_connections pll_clock_port var_test_mode} { # Define top -level port names to create set var_slow_clock slow_clock set var_cap_config cap_cycle_config set var_fast_cap_mode fast_capture_mode set var_scan_in occ_control_scan_in # Create top-level ports for new create_port $var_slow_clock create_port $var_cap_config[1:0] create_port $var_fast_cap_mode create_port $var_scan_in
signals -direction -direction -direction -direction
input input input input
# Create instances of OCC for each clock in $clock_conntections and connect set num_clocks [sizeof_collection $clock_connections] for {set i 1} {$i <= $num_clocks} {incr i} { create_instance clock_control_i$i -of_module tessent_occ } create_connection $pll_clock_port [get_pins clock_control_*/FAST_CLK] create_connection $var_fast_cap_mode [get_pins clock_control_*/FAST_CAP_MODE] create_connection $var_slow_clock [get_pins clock_control_*/SLOW_CLK] create_connection $var_test_mode [get_pins clock_control_*/TEST_MODE] create_connection $var_scan_enable [get_pins clock_control_*/SCAN_EN] for {set i 1} {$i <= $num_clocks} {incr i} { create_connection $var_cap_config clock_control_i$i/CAP_CYCLE_CONFIG } # Concatenate condition bit shift s into new load-only scan chain create_connection $var_scan_in clock_control_i1/SCAN_IN for {set i 1} {$i < $num_clocks} {incr i} { create_connection clock_control_i$i/SCAN_OUT clock_control_i[expr $i + 1]/SCAN_IN } set internal_scan_out clock_control_i$num_clocks/SCAN_OUT # Connect the output of OCC blocks to the input of the clock muxes for {set i 1} {$i <= $num_clocks} {incr i} { create_connection clock_control_i$i/CLK_OUT [get_single_name [index_collection \ $clock_connections [expr $i - 1]]] }
Mentor Graphics Confidential
16
January 2014
################################################################### ## Create dofile to setup design with OCC ################################################################### set var_scan_group_name grp1 set file_dofile [open dofiles/occ_scan_setup.dofile w] puts $file_dofile "# Define slow clock created by this script. If it already exists and \ connected to the OCC" puts $file_dofile "# outside of this script, this can be removed but it should be \ defined during ATPG." puts $file_dofile "add_clocks 0 $var_slow_clock" puts $file_dofile "" puts $file_dofile "# Define clock control scan chain as load-only to reduce pins. \ Should be uncompressed if" puts $file_dofile "# number of OCCs is high to reduce specified bits." puts $file_dofile "add_scan_chains -load_only clock_control_chain $var_scan_group_name \ $var_scan_in $internal_scan_out" close $file_dofile }
After OCC insertion, the modified design is saved and patterns can be generated using internal clocks.
3.7.
Step 3: Uncompressed Pattern Generation
To run pattern generation, execute the following script at the top directory: 3.create_patterns
The script can be used to perform slow or fast clock capture and can also initialize the design using IJTAG/PDL or explicit input constraints. Invocation options described at top of the script determine which combination is used. If no arguments are specified, by default the script will initialize the design using IJTAG/PDL and create slow speed capture pattenrs. Contents of this and other included dofiles are shown here: #! /bin/sh -f #\ exec tessent -shell -dofile "$0" -arg ${1+"$@"} # Script to create patterns. Invoke with -arguments to change default settings. # - To create at-speed patterns # 3.create_patterns -arguments atpg_mode=fast_capture # - To initialize using top-level input constraints # 3.create_patterns -arguments initialization=constraints # Define default values to -specifiable parameters array set params { atpg_mode slow_capture initialization pdl } # Override defaults with -specified command line options, if specified array set params $tessent__arg set atpg_mode $params(atpg_mode) set initialization $params(initialization) # Create log file set_logfile_handling logfiles/3.create_patterns_${atpg_mode}_${initialization}.log -replace if {$initialization == "pdl"} { set_context patterns -ijtag read_verilog design/gates/u_scan_occ.vg read_cell_library library/tessent/adk.tessent_cell read_icl design/gates/tessent_occ.icl
Read design netlist and ICL file to setup design for initialization with IJTAG/PDL
add_black_box -module pll
Mentor Graphics Confidential
17
January 2014
report_module_matching -icl Run DRC to find each instance of Tessent OCC and learn connectivity to top-level ports
set_system_mode analysis set_system_mode setup set_context patterns -scan
# Read the PDL file that defines necessary constrain values on boundary of OCC module source design/gates/tessent_occ.pdl # Apply the constrain values in PDL to all instances of the OCC if {$atpg_mode == "slow_capture"} { set fast_cap_mode_value 0 } elseif {$atpg_mode == "fast_capture"} { set fast_cap_mode_value 1 } else { error "Invalid command line argument '$atpg_mode' for 'atpg_mode '. Use '-arguments atpg_mode=
Mentor Graphics Confidential
18
January 2014
if {$atpg_mode == "fast_capture"} { set_fault_type transition -no_shift_launch set_output_masks on add_input_constraints -all -hold } # Define internal clocks for clock controller dofile scripts/tessent_occ.tcl tessent_occ_config $atpg_mode # Run Design Rule Checks set_system_mode analysis report_input_constraints
For at-speed test using fast clock capture, setup fault type, mask outputs, and constrain inputs
Script and procedure call to find all Tessent OCCs in design and automatically define internal clocks and setup for ATPG
Procedure call to configure design based on DRC results
tessent_occ_config $atpg_mode
if {$atpg_mode == "fast_capture"} { set_external_capture_options -capture_procedure ext_fast_cap_proc } # Run ATPG create_patterns # Save pattern (SIM_KEEP_PATH includes full pattern file pathnames in test bench) report_patterns > patterns/patterns_report_$atpg_mode.txt write_patterns patterns/pat1_${atpg_mode}_parallel.v -verilog -parallel -parameter_list {SIM_KEEP_PATH 1} -replace set_pattern_filtering -sample 2 write_patterns patterns/pat1_${atpg_mode}_serial.v -verilog -serial -parameter_list {SIM_KEEP_PATH 1} -replace exit
Once patterns are generated, test benches are saved for simulation against Verilog. The SIM_KEEP_PATH parameter ensures that the full pathnames of pattern files are saved in the test bench so that it is not mandatory to run the simulation from the patterns directory. The test procedure file used for ATPG is common for all test modes and is stored in the file dofiles/atpg.testproc. The content of this file is shown below: // // Test Procedure File // timeplate tmp1 = force_pi 0 ; measure_po 2 ; pulse_clock 16 32; period 64 ; end;
Timeplate globally defines force, measure, and pulse timing for all signals. Note the pulse_clock statement is new in 2013.4 release.
procedure test_setup = timeplate tmp1 ; cycle = force test_mode 1; pulse rst_in; pulse slow_clock; end; end; procedure shift = timeplate tmp1 ; cycle = force_sci ; measure_sco ; pulse slow_clock; pulse int_clk1; pulse int_clk2; pulse int_clk3;
Mentor Graphics Confidential
19
January 2014
end; end; procedure load_unload = scan_group grp1 ; timeplate tmp1 ; cycle = force test_se 1; end; apply shift 44; end; procedure external_capture ext_fast_cap_proc = timeplate tmp1 ; cycle = force_pi ; pulse slow_clock; end; end;
The external_capture procedure is used for fast clock capture to ensure a pulse on slow_clock at the start of each pattern. See section 2.8 and Figure 9 for an explanation of why this pulse is needed.
Most of the test procedure file is typical to most scan design. Additionally, the test procedure file contains the external capture procedure ext_fast_cap_proc to ensure proper pulses on external clocks are saved to the pattern file when fast clock is used for capture.
3.8.
Step 4: Pattern Verification
The next step is to simulate the generated patterns to ensure no mismatches exist. The following script simulates serial and paralel Verilog test benches in various test modes: 4.simulate_patterns
The script compiles the design, library, and patterns using ModelSim and verifes that all patterns (serial and parallel) simulate with no mismatches. The simulation waveform for slow capture pattern number 0 is shown in Figure 13:
Figure 13 – Pattern Simulation Results for Slow Capture Test The last 3 signals are the output of the clock control blocks which show a single pulse on the output of clock_control_i2/CLK_OUT. This matches the output of the report_patterns command which is stored in the file patterns/patterns_report_slow_capture.txt. The content of this file for the first few pattersn is shown here: // // // // // // // // //
pattern # --------0 1 2 3 4 5
type ------basic basic basic basic basic basic
cycles -----1 1 1 1 1 1
loads ----1 1 1 1 1 1
...
capture_clock_sequence --------------------------------------------[slow_clock,int_clk2,int_pll] [slow_clock,int_clk2,int_pll] [slow_clock,int_clk3,int_pll] [slow_clock,int_clk2,int_pll] [slow_clock,int_clk2,int_pll] [slow_clock,int_clk2,int_pll]
We can see that scan pattern number 0 pulses the top level slow_clock and internal clocks int_clk_2 and int_pll. Note that the top level reference_clock which is a free-running clock is also pulsed in the Mentor Graphics Confidential
20
January 2014
test bench but because it is an asynchronous free-running clock it is not reported in the output of the report_patterns command. Similar observations can be made for fast capture pattern number 0 which pulses in_clk2 followed by int_clk2. The waveform for this pattern is shown in Figure 14:
Figure 14 – Pattern Simulation Results for Fast Capture Test The corresponding report_patterns output is shown below: // // // //
3.9.
pattern # --------0
type ------clock_sequential
cycles -----2
//
1
clock_sequential
2
//
2
clock_sequential
2
//
3
clock_sequential
2
//
4
clock_sequential
2
//
5
clock_sequential
2
loads ... capture_clock_sequence -----------------------------------------1 [int_clkg_3,int_clk2,int_clkg_2,int_clkg_1,int_pll] [int_clkg_3,int_clk2,int_clkg_2,int_clkg_1,int_pll] 1 [int_clkg_3,int_clk2,int_clkg_2,int_clkg_1,int_pll] [int_clkg_3,int_clk2,int_clkg_2,int_clkg_1,int_pll] 1 [int_clkg_3,int_clk2,int_clkg_2,int_clkg_1,int_pll] [int_clk3,int_clkg_3,int_clkg_2,int_clkg_1,int_pll] 1 [int_clkg_3,int_clk2,int_clkg_2,int_clkg_1,int_pll] [int_clkg_3,int_clk2,int_clkg_2,int_clkg_1,int_pll] 1 [int_clkg_3,int_clk2,int_clkg_2,int_clkg_1,int_pll] [int_clkg_3,int_clk2,int_clkg_2,int_clkg_1,int_pll] 1 [int_clkg_3,int_clk2,int_clkg_2,int_clkg_1,int_pll] [int_clkg_3,int_clk2,int_clkg_2,int_clkg_1,int_pll]
Steps 5 to 8: Compression Logic Insertion, ATPG, and Verification
The next steps in the test case demonstrate the use of Tessent Shell to create and insert EDT compression logic [step 5] and to synthesize the created RTL with Design Compiler [step 6]: 5.insert_edt_ip 6.synthesize_edt_ip
The IP creation step runs Tessent Shell with slow clock and fast clock setup files in order to automatically create the ATPG files for both clock speeds. Since only one compression hardware design file is needed, only the IP creation step with slow clock writes the compression hardware to a file. This file is synthesized in step 6. NOTE: The compiled synthesis library file t18.db is not shipped with this test case due to licensing agreements but should be placed in the library/synopsys directory for use by various synthesis steps. The t18.db file can be created from the supplied liberty file (t18.lib) using Synopsys’ lc_shell library compiler. The next step is to create compressed patterns using the slow and fast capture clocks [step 7]: 7.create_edt_patterns
Mentor Graphics Confidential
21
January 2014
7.create_edt_patterns atpg_mode=fast_capture
Similar to the 3.create_patterns script, the default behavior of the pattern generation script is to use the ICL and PDL descriptions of the OCC to constrain the inputs of each OCC. This simplifies the flow by automatically finding all OCCs in the design and ensuring that their control inputs defined in the PDL are properly constrainted. An alternative method is to use explicit input constraints in the dofile but this requires the to ensure the OCCs are connected to the top and works for directly connected pins but may be more complicated in other cases. The ICL/PDL method is a more general solution which also handles hardware that is initialized through IJTAG or TAP controllers. In order to use input constraints in the pattern generation script, the initialization=constraints argument can be used at command line. For example: 7.create_edt_patterns initialization=constraints 7.create_edt_patterns initialization=constraints atpg_mode=fast_capture
The final step is to simulate the compressed patterns to ensure no mismatches exist. Script 8 simulates all compressed patterns: 8.simulate_edt_patterns
To run all steps in the test case, you can use the 0.run_all_steps script but as stated earlier, the synthesis library is not part of the test case and will require proper setup for running step 5 to synthesize the EDT hardware. To obtain the complete test case for the flow described in this application note, use the link in section 1 of this document. If the target EDT hardware uses the Low Pin Count Test (LPCT) controller, Mentor Customer for information on how to use a modified OCC design with the LPCT EDT hardware.
Mentor Graphics Confidential
22
January 2014
Related Documents 171j1w

A Practical On-chip Clock Controller Circuit Design 4b1in
November 2022 0
Digital Clock Circuit 2q2n5m
May 2022 0
Lm8365 Digital Clock Circuit Board 2k1j6y
July 2021 0
Solar Charger Controller Circuit Diagram 3s115
November 2019 123
Reset Circuit Of 8051 Controller 4k552
November 2019 15
Golf Trolley Controller Circuit Diagram 6t54h
November 2021 0More Documents from "Nikhil Pratap Garg" 2t675e
A Practical On-chip Clock Controller Circuit Design 4b1in
November 2022 0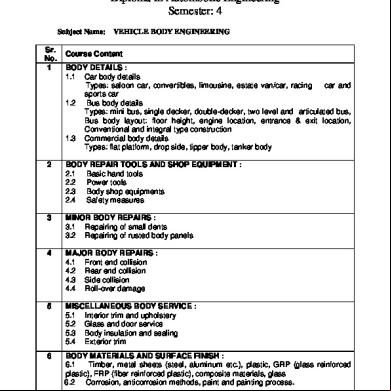
Vehicle Body Engineering 3r214c
October 2019 292
Strategic Management A Case Study Of Pakola 611s4a
December 2019 82
Tata Corus Case Analysis @ Garg 6o121d
November 2019 49
Microsemi_tp2700_datsheet_vj(1) 4r5m5t
November 2019 63